⬅️ Previous part: 4. Desktop and mobile controls ➡️ Next part: 6. Collision detection
5. Adding and moving shapes
After successfully implementing the movement of the Monster it would be great to add the shapes that will be falling down, and move them down onto the scene.
Note
Note that instead of having a fixed number of items placed on a scene, we will generate them in a way the game will be an actual endless type.

Click on the "Add a new object" in the right panel to open a popup.

Select a "Sprite", like we did with the Monster before.

Name it "Shape1", and click on the "Add an animation" button.

The animation of this object is called "NewObject1" - load an image of the triangle from the disk. The render time is not important as it's the only frame we have, same goes for looping or not. Click "Apply" to save it.

Click on the "Add a new object" again.

Do the same for the second shape: "Shape2" as the name, "NewObject2" as the animation, and a square image, then "Apply".

Repeat for the circle.

The last, fourth shape is a pentagon.

Now all the four shapes are visible in the "Objects" list in the right panel. We will group them with the "Objects" groups editor - click on the fourth icon in the top right menu, the one that have three cubes on it.

It will expand the current view and show an extra "Object Groups" panel on the right - click on "Group" to open a popup.

Click on "Choose an object to add to the group", and then select all four shapes.
Note
Remember to not add the Monster to that group, only the shapes.

Keep adding the shapes until all are listed in the group, and then click "Apply".

Now click on the three vertical dots next to the "Group" in the "Object Groups" panel to open a context menu and click "Rename".

Rename the group to "Shapes", and confirm.

Add a new comment to indicate this new section will be about the shapes.

Then click on "Add a new event", and "Add condition" to open a popup.

In the "Other conditions" tab, find "Timers and time", and click it.
Note
Don't have the "Other conditions" tab? Don't panic! Go to GDevelop preferences (Click on the "File" (or "GDevelop 5" on macOS) menu, then "Preferences". Activate "Use the new action/condition editor". You can then go back to the tutorial. 

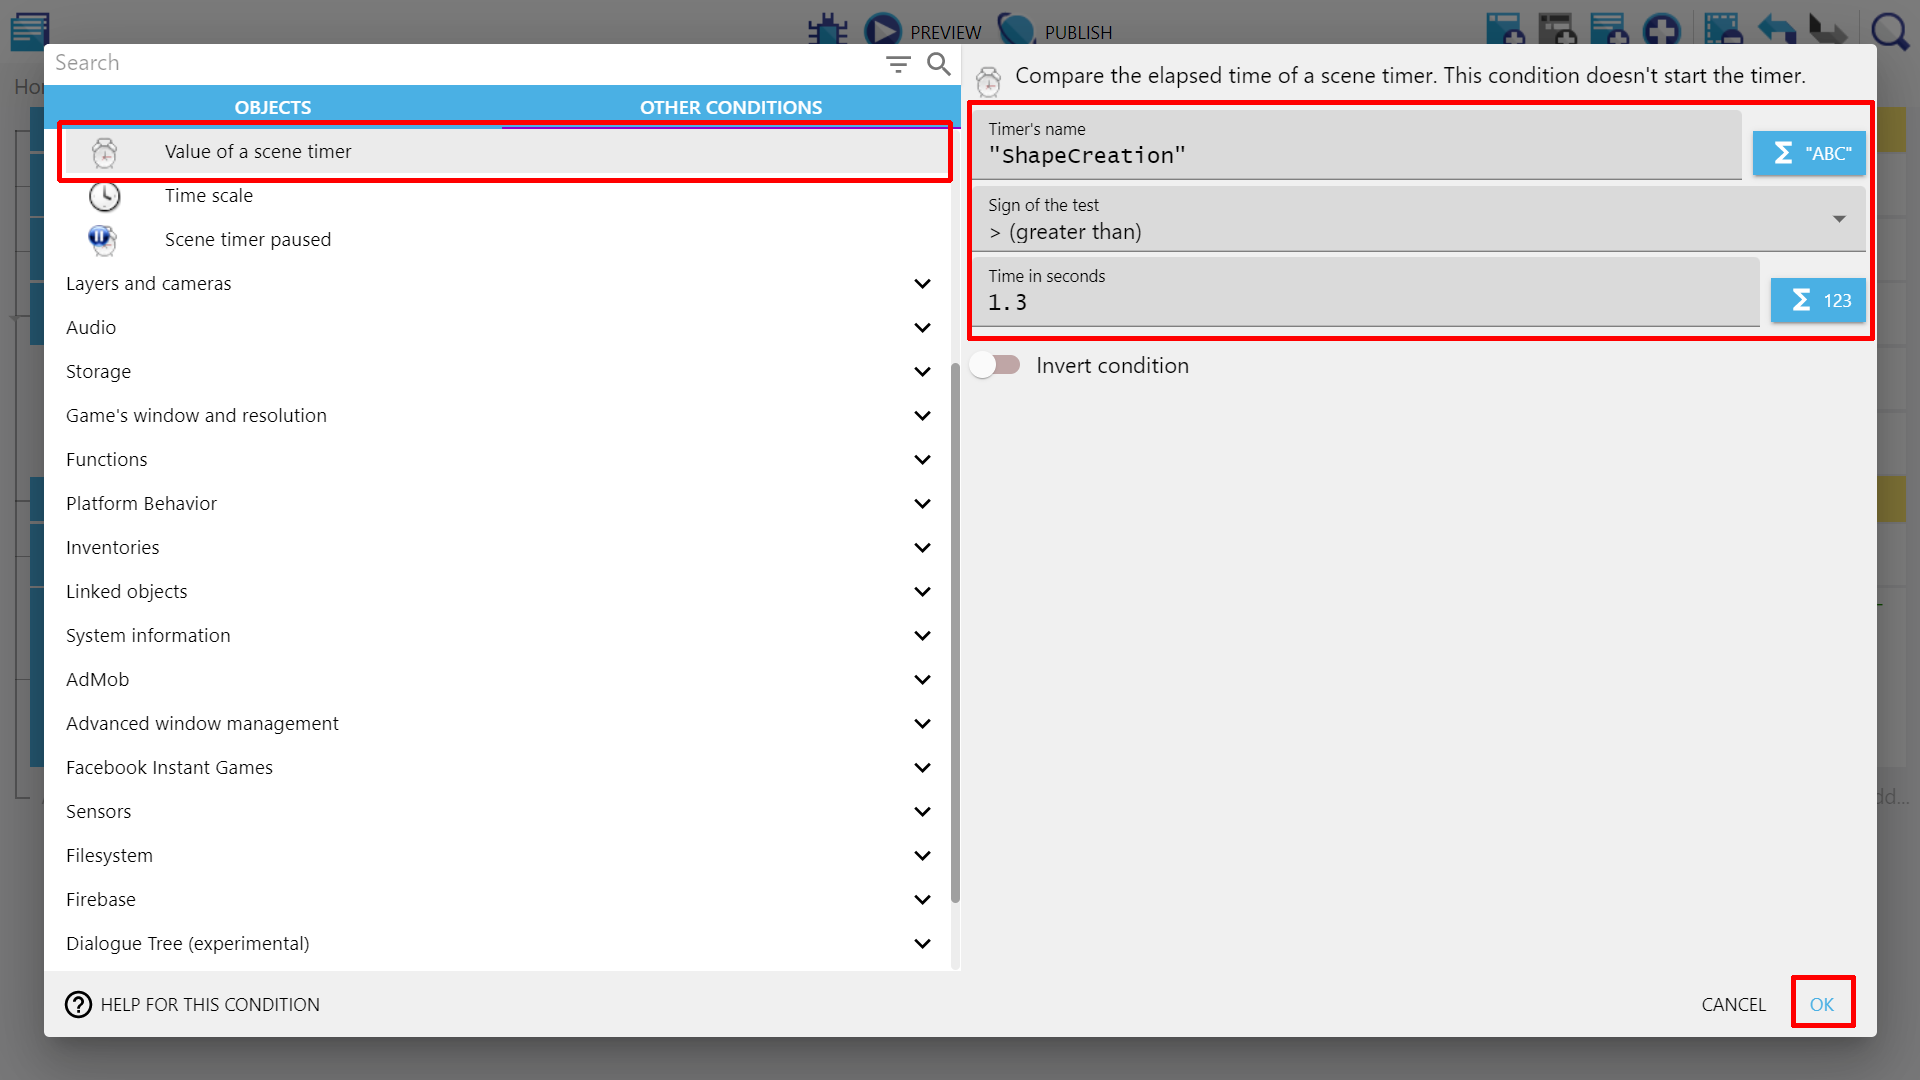
Then from the dropdown, select "Value of a scene timer" and enter two values. First is 1.3 in the "Time in seconds" field which will represent the number of seconds - every 1.3 seconds we will drop new shape onto the scene.
Second is the "Timer's name" - set that to "ShapeCreation", and click "Ok" when you finished entering both values.

Now when the condition is in place, let's add the action.

Click on the "Other actions".

Then search for the "Create an object from its name" that will be listed in the "Non-objects and other actions".

In the right panel, look for the "Shapes" group and click it.

The three values we will enter are: "Text representing the name of the object to create", "X position", and "Y position". Name it "Shape" + ToString(RandomInRange(1,4)), so that whenever a new object is created, it will be one of the four available shapes.
The X position is RandomInRange(80, 640-80) - this means we will pick a random position between 80 and 560 pixels. Why those specific values? To make sure the shapes are rendered fully on the scene and are not partially cut out if they'd render on any of the edges of the screen.
The Y position is -100, so the new shape appear above the visible area, and will then move down. It will look more natural than spawning it right onto the gameplay area.
Note
Confused about the positions on screen? If you move your cursor in the scene editor, you'll see in the bottom-left the X and Y position of the cursor. Useful to get an idea of where a position is while working with events like these.

Let's add another action to that.

Be sure the "Shapes" are selected, then look for the "Angle" in the next panel - this will change the angle of rotation of an object. In "Modification's sign" select = (set to) and the value RandomInRange(0, 360).
Now whenever a new shape is created and dropped onto the gameplay area, it will be rotated by a random value from between 0 and 360 degrees. This will add some variety to how the shapes are presented in the game.

Let's go even further with the customizations - click on the "Add action" once again.

Click on "Shapes", then look for "Scale", select = (set to) and enter RandomFloatInRange(0.8, 1.6). This will customize our shapes even more by introducing random scaling - some of them will be a little bit smaller than the original (80% of the original), and some will be bigger (160%).
Note
Rotation and scaling is a great way to make the game more fun even though we still have only four basic shapes in play.

Now go into the "Other actions" to look for "Timers and time", and select "Start (or reset) a scene timer".

The timer's name is "ShapeCreation", so whenever a new shape is created, the timer is reset and we wait for 1.3 seconds before a new shape is created again, and again, indefinitely.

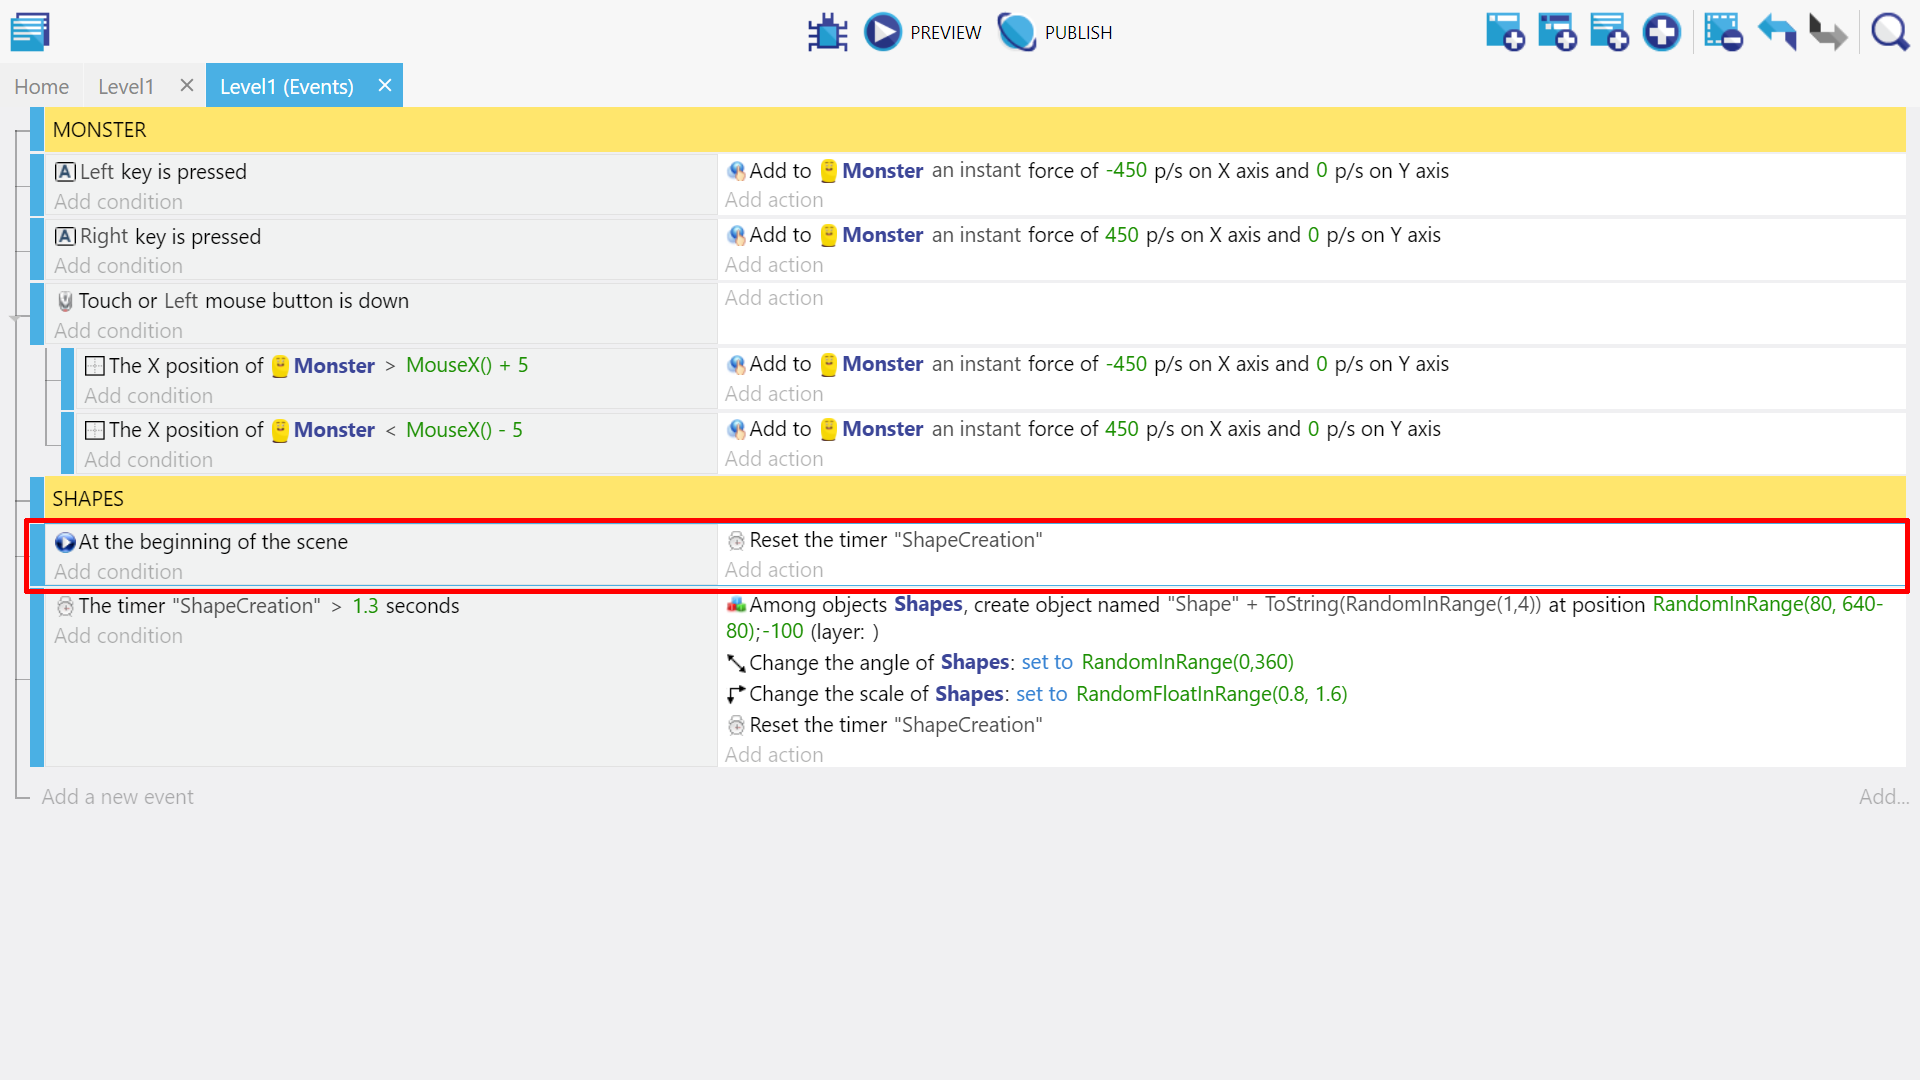
Next create a new event above the shapes event and give it the condition "at beginning of the scene", and copy/paste the earlier create "Start (or reset) a scene timer" action for "ShapeCreation" to this new event. This will start the timer at the beginning of the game in so the shapes event will trigger the first time.

We're almost done with the shapes. Create a comment called "Move shapes", then click on "Add a new empty event", then "Add action".

Add an action: select "Shapes", then "Add a force (angle)", and set the "Angle" to 90, and "Speed in pixels per second)" to 100.

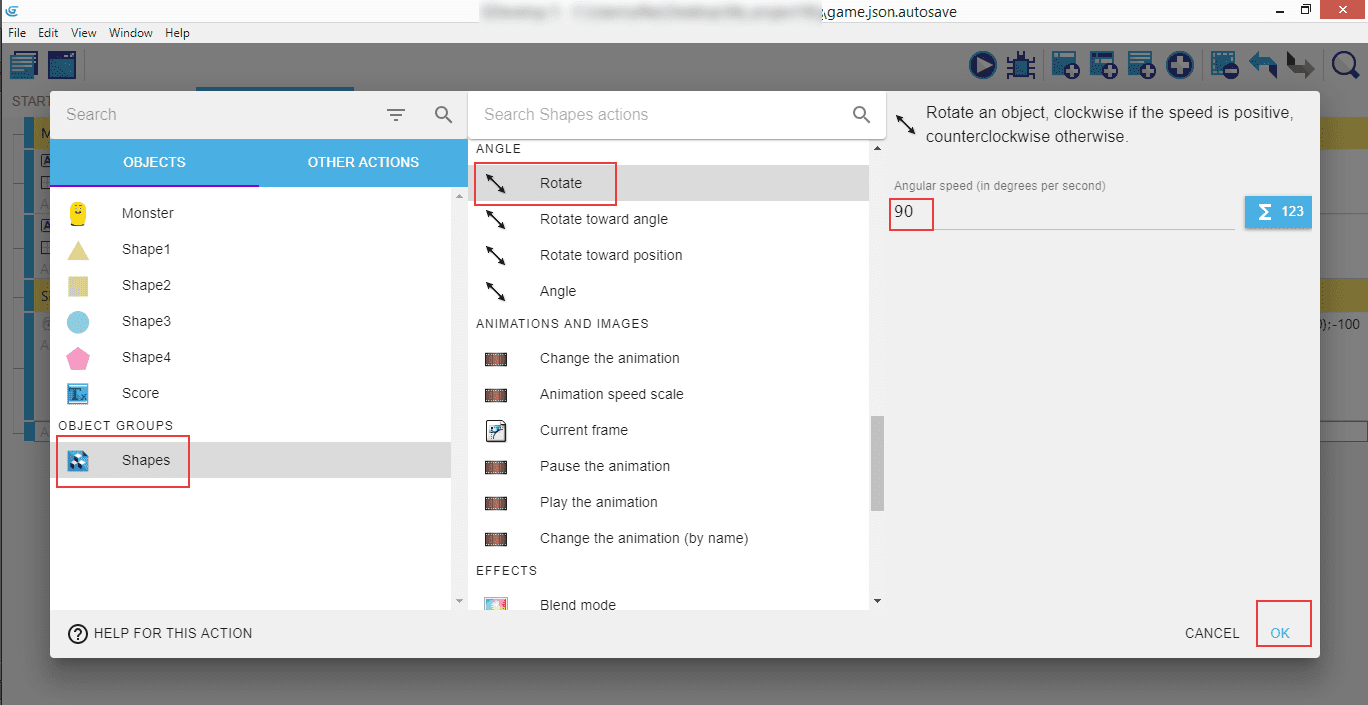
Add another action: "Shapes", then "Rotate", and set the "Angular speed (in degrees per second)" to 90.
That's it! Not only our shapes are spawned randomly and indefinitely, and have random rotation and scaling at the beginning, but they also rotate while falling down.

Launch the game to see all that in action - shapes should fall down the scene. It feels like something is missing, right? They go through the Monster, so we need to introduce collision detection to be able to collect them.
⬅️ Previous part: 4. Desktop and mobile controls ➡️ Next part: 6. Collision detection